What is Version Control:General
- A system that keeps records of your changes
- Allows for collaborative development
- Allows you to know who made what changes and when
- Allows you to revert any changes and go back to a previous state.
What is Version Control:Git Specific
Distributed version control- Users keep entire code and history on their location machines
- Users can make any changes without internet access
- (Except pushing and pulling changes from a remote server)
What is Git?
- Started in 2005
- Created by Linus Torvalds to aid in Linux kernel development
- Git isn’t the only version control system – there is Subversion, Perforce -> but git is (or I believe) is the best!
How does git work?
Can
Snapshots
- The way git keeps track of your code history
- Remember : you are in control and you let git know what you want to do – You decide when to take a snapshot, and of what files.
- You then have the ability to go back to visit any snapshot
- Your snapshots from later on will stay around, too: You can go backwards and forwards ….
Essentially it is the mechanism which enables git to automatically keep track what all your files look like at a given point in time.
Commit
- The act of creating a snapshot
- Can be a used as noun or verb:
- “I commited the code”
- “I just made a new commit”
- Commits contain three pieces of information:
- Information about how the files changed from previously
- A reference to the commit that came before it: called the Parent Commit
- A hash code name which will look something like:
2d2ec5069fc6776c80b3ad6b7cbde3cade4e
Respositories
- A collection of all the files and the history of those files
- Consists of all your commits
- The distinct place where all your hard work is stored
- Can live on a local machine and/or on a remote server ( i.e.GitHub!)
- The act of copying a repository from a remote server is called cloning
- Cloning from a remote server allows teams to collaborate on the same repository
- The process of downloading commits into your local repository from the remote repository without changing your local repository is called fetching changes
- The process of downloading commits that don’t exist in your local repository on your machine and altering your local repository from a remote repository is called pulling changes
- The process of adding your local changes to the remote repository is called pushing changes
Branches
- All commits in git live on some branch
- But there can be many, many branches (dependent on the collaborators – or workflow strategy chosen
- The main branch in a project is by default called the master branch
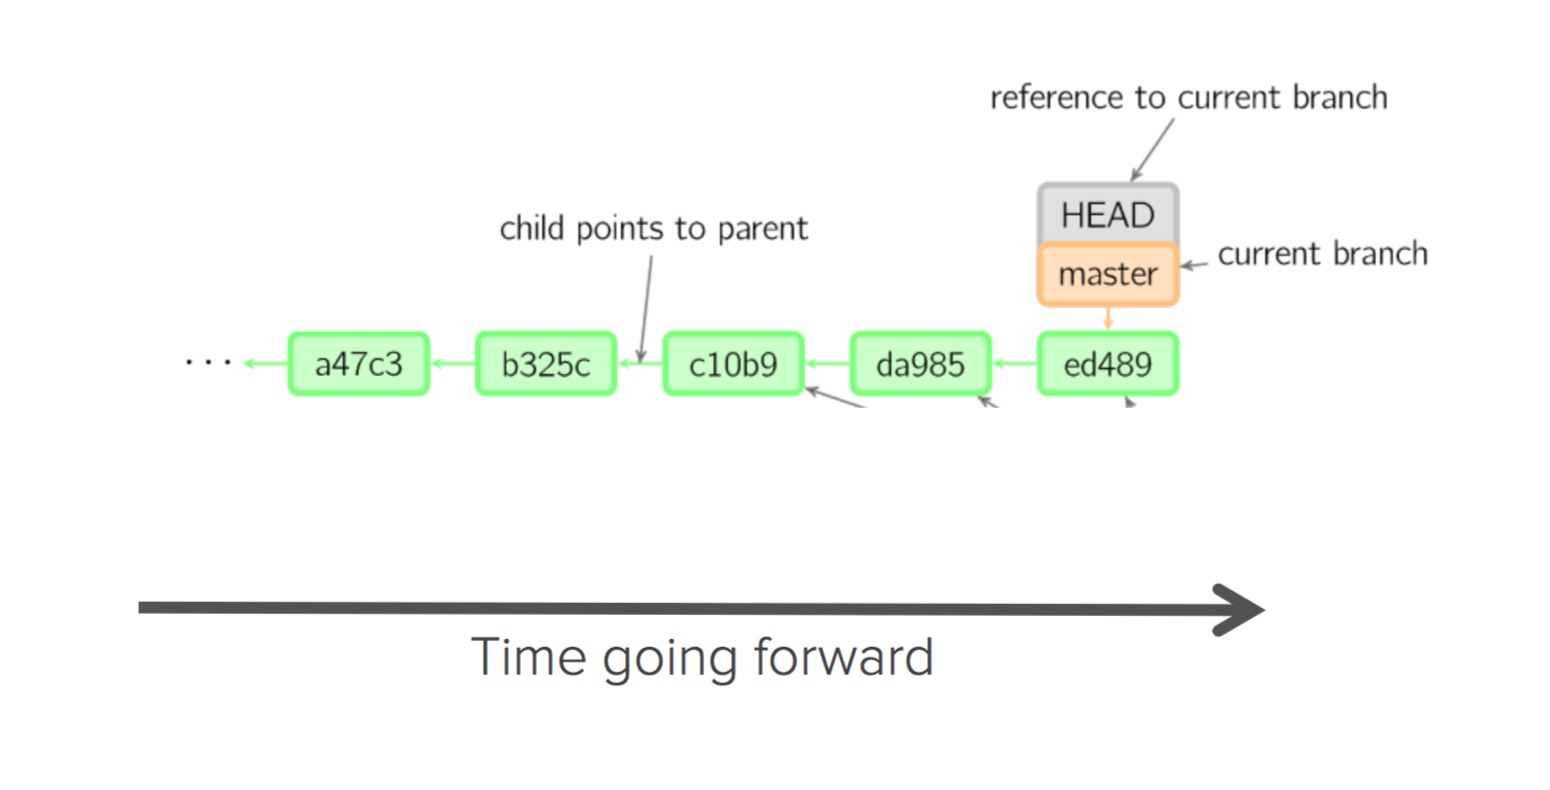
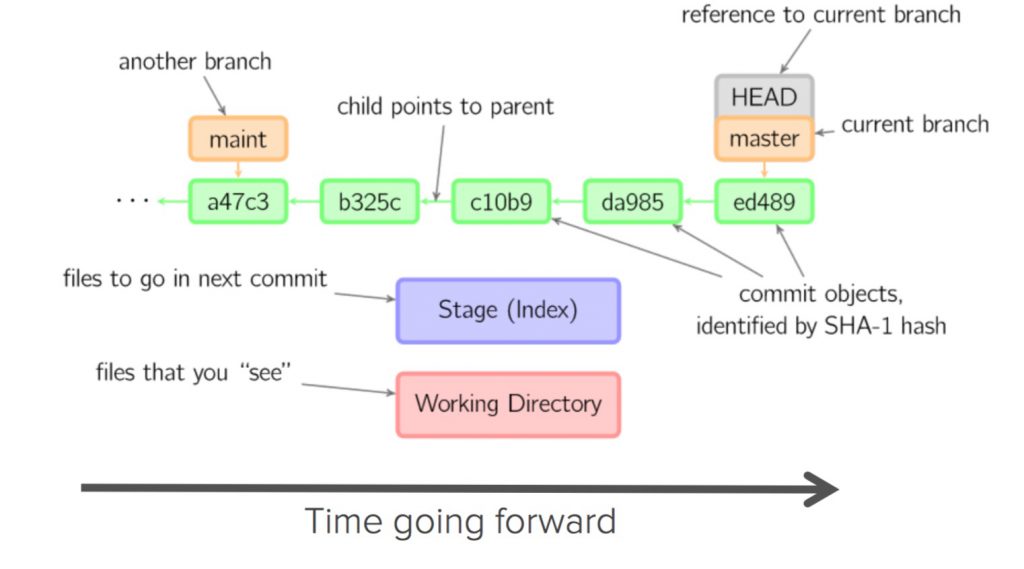
What does a typical project consisting of a git repository look like?
- A bunch of commits linked together that live on some branch, contained in a repository
Lets look at the following figure – thanks to http://marklodato.github.io/visual-git-guide/index-en.html (also an excellent resource and tutorial).
- The HEAD is known (in most cases) as the reference to the most recent commit.
- The MASTER is the default name for main branch in your project
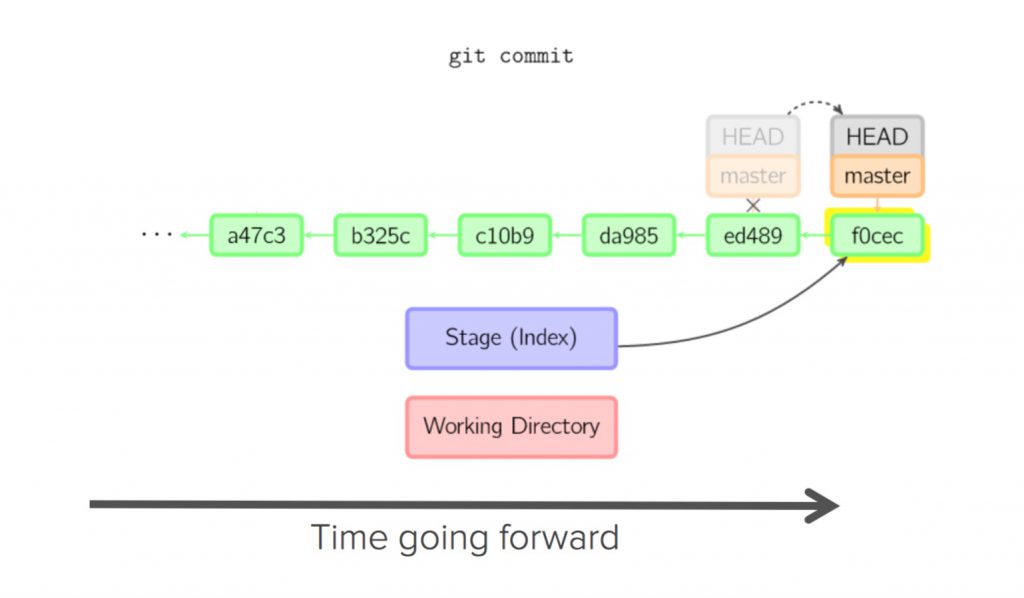
Process for making a commit
- Make some changes to a file(s)
- Use the git add command to put the file onto the staging environment (where it will be tracked)
- Use the git commit command to create a new commit
The follwing two figures demonstrate this process:
What is Git Hub :: overview ::
- www.github.com
- Largest web-based git repository hosting service (not the only one!) – aka remote repositories
- Allows for code collaboration with anyone online (who also has a github account)
- Founded in 2008
- Also has an Enterprise edition for businesses
- Adds extra functionality on top of git – i.e. UI, documentation, bug tracking, feature requests, pull requests, and more!
Step 1: Install git and create a GitHub account
The first two things you’ll want to do are install git and create a free GitHub account.
- If you are on a mac you already have git installed 🙂 If you are on windows then follow this link to download and install git for windows.
- Note that for this tutorial we will be using git in the command prompt / terminal only. While there are some great git GUIs (graphical user interfaces), it’s easier to learn git using git-specific commands first and then to try out a git GUI (i.e. github desktop) once you’re more comfortable with the commands.
- If you don’t have much experience with the terminal and basic commands, check out this tutorial (especially the ‘Navigating the Filesystem’ and ‘Moving Around’ sections).
- Next, we’ll want to do a few things to customize your Git environment – lets follow the link here
- Once you’ve done that, create a GitHub account here.
Accounts are free for public repositories, but there’s a charge for private repositories – UNLESS you are a student — in this case you should get the student package here.
Step 2: Create a local git repository
When creating a new project on your local machine using git, you’ll first create a new repository.
To begin, open up a terminal and move to where you want to place the project on your local machine using the cd (change directory) command. For example, if you have a ‘webProjects’ folder on your desktop, you’d do something like:
1 2 3 | te:~ te$ cd ~/Desktop/webProjects te:webProjects te$ mkdir testProject te:webProjects te$ cd testProject |
Next – we need to make our new testProject folder “gitable”. The next command git init will do this and if successful, the terminal will respond with a confirmation.
1 2 | te:testProject te$ git init Initialized empty Git repository in /Users/te/Desktop/webProjects/testProject/.git/ |
Step 3: Add a new file to our newly created repo
Now go ahead and create/add a new empty file to the project directory, using any text editor you like or running the touch command:
1 2 3 | te:testProject te$ touch testFileA.txt te:testProject te$ ls testFileA.txt |
Once you’ve added or modified files in a folder containing a git repository, git will notice that changes have been made inside the repository. But, git won’t officially keep track of the file unless you explicitly tell it to.
After creating the new file, you can use the git status command to see which files git knows exist for that particular repository.
1 2 3 4 5 6 7 8 9 10 11 | te:testProject te$ git status On branch master Initial commit Untracked files: (use "git add <file>..." to include in what will be committed) testFileA.txt nothing added to commit but untracked files present (use "git add" to track) |
What this basically says is, “you created a new file called testFileA.txt, but unless you use the ‘git add’ command we aren’t going to do anything with it.”
Lets revise::: The staging environment, the commit, and you:
One of the most confusing parts when you’re first learning git is the concept of the staging environment and how it relates to a commit.
A commit is a record of what files you have changed since the last time you made a commit. Essentially, you make changes to your repository (for example, adding a file or modifying one) and then you tell git to put those files into a commit.
Commits make up the essence of your project and they are the mechanism which allow you to go back to the state of a project at any point.
So, how do you tell git which files to put into a commit? This is where the staging environment comes in . As seen in Step 3, when you make changes to your repository, git notices that a file has changed but won’t do anything with it. To add a file to a commit, you first need to add it to the staging environment. To do this, you can use the git add
Once you’ve used the git add command to add all the files you want to the staging environment, you can then tell git to package them into a commit using the git commit command.
Adding a file to the staging environment
To add a single file to the staging environment, we use the git add < filename > command:
1 | te:testProject te$ git add testFileA.txt |
Now if we rerun the git status command:
1 2 3 4 5 6 7 8 9 | te:testProject te$ git status On branch master Initial commit Changes to be committed: (use "git rm --cached <file>..." to unstage) new file: testFileA.txt |
You should see that git has added the file to the staging environment – but NOT committed …
We need not add one file at the time to the staging environment. If we had > 1 file and we wanted to add all those files and/or folders we could use the git add . command.
Note :: Git has a help manual available within the terminal – so if ever you do not know how to write a particular command – then this should be your first point of reference. See this link for how to get help …
Step 4: Create a commit
Let’s now commit our file. Run the command git commit -m “Your message about the commit”. The message at the end of the commit should be something related to what the commit contains – maybe it’s a new feature, maybe it’s a bug fix, maybe it’s just fixing a typo. Don’t put a message like “asdfadsf” or “foobar” 🙁
1 2 3 4 | te:testProject te$ git commit -m "My first commit" [master (root-commit) f6d3ac5] My first commit 1 file changed, 0 insertions(+), 0 deletions(-) create mode 100644 testFileA.txt |
Viewing the Commit History
If you want to view (not modify) the commit history for your repository – you can run the git log without any arguments:
1 2 3 4 5 6 | te:testProject te$ git log
commit f6d3ac50880a1a30b4f05be53fd431d9262d701b
Author: intrvalia <sr@intrval.xyz>
Date: Sat Sep 24 20:02:35 2016 -0400
My first commit |
As you can see, this command lists each commit with its SHA-1 checksum, the author’s name and email, the date written, and the commit message. There are arguments that you can add to this command as referenced here – but we will not go into those here …
Go back to a certain point in your commit history:
Let’s make another commit:
Open the file in the repo and type some text into it.
Then run the git status command:
1 2 3 4 5 6 7 8 9 | te:testProject te$ git status On branch master Changes not staged for commit: (use "git add <file>..." to update what will be committed) (use "git checkout -- <file>..." to discard changes in working directory) modified: testFileA.txt no changes added to commit (use "git add" and/or "git commit -a") |
As you can see – we modified the file but git has not added nor committed anything – we need to explicitly tell it to do so – so lets add and commit our changes:
1 2 3 4 | te:testProject te$ git add testFileA.txt te:testProject te$ git commit -m "A line was added" [master df7af48] A line was added 1 file changed, 1 insertion(+) |
Ok – now run git log command:
1 2 3 4 5 6 7 8 9 10 11 | commit df7af48779b7c8b37823047c77b48e1ae1ca74d1
Author: intrvalia <sr@intrval.xyz>
Date: Sat Sep 24 20:28:43 2016 -0400
A line was added
commit f6d3ac50880a1a30b4f05be53fd431d9262d701b
Author: intrvalia <sr@intrval.xyz>
Date: Sat Sep 24 20:02:35 2016 -0400
My first commit |
You can see now we have two entries in our history . So what if I wanted to go back to the first commit to see the state of the repository? What we need to do is access a previous snapshot of the repository using the git checkout <hash > command. The “hash” refers to the unique id associated with each commit – so lets go look at our previous state:
1 2 3 4 5 6 7 8 9 10 11 12 13 | te:testProject te$ git checkout f6d3ac50880a1a30b4f05be53fd431d9262d701b Note: checking out 'f6d3ac50880a1a30b4f05be53fd431d9262d701b'. You are in 'detached HEAD' state. You can look around, make experimental changes and commit them, and you can discard any commits you make in this state without impacting any branches by performing another checkout. If you want to create a new branch to retain commits you create, you may do so (now or later) by using -b with the checkout command again. Example: git checkout -b <new-branch-name> HEAD is now at f6d3ac5... My first commit |
Now if you open the file in your repository – you should see no line of text! – we have returned to the previous state of the repository.
However note the detached head state notification:
The HEAD pointer in Git determines your current working revision of the repository (and thereby the files that are placed in your project’s working directory) and when we perform the checkout
Let’s go back to our CURRENT snapshot by running the git checkout master command:
1 2 3 | te:testProject te$ git checkout master Previous HEAD position was f6d3ac5... My first commit Switched to branch 'master' |
Now, if you look at the state of your repository you are back at the last commit … What we did essentially did was go back to the state where our HEAD pointer should be.
Question what is master?
Step 5: Creating branches
Incentive: You want to add/modify any of the files in your repository – but are worried that these changes will break your project or you are not sure that you will want to keep these changes. This is where git branches come in.
As we just saw: when you create a new repository, a branch called the “master” branch is AUTOMATICALLY created. Every time you commit a change to your repository, these changes are recorded in the “master” branch. Note: when we did the checkout command previously – git told us that we were no longer in the master branch – and this is where we essentially were going wrong …
Branches allow you to move back and forth between the different states of your repository. For instance, if you were working on a website, and you wanted to add a new feature – you could create a new branch just for that page without affecting the main part of the project. Once you’re happy with the page, you can merge your changes from your branch back into the master branch.
When you create a new branch, Git keeps track of which commit your branch ‘branched’ off from, so it knows the history behind all the files.
In our repository example, we are currently on the master branch. Lets say we want to make changes to our file and we will add a new file to our repository – we will create a new branch to do this:
First: to create a new branch: use the command git checkout -b < branchname >:
1 2 | te:testProject te$ git checkout -b testBranch Switched to a new branch 'testBranch' |
You can choose any name for your branch name. This command will automatically create a new branch (stemming from the exact point that your repository is CURRENTLY at), and then will ‘check it out’, meaning it will move you to that branch, off of the master branch.
After running the above command, you can use the git branch command to confirm that your branch was created (along with viewing what other branches you have associated with your repository):
1 2 3 | te:testProject te$ git branch master * testBranch |
Now if we create a new file and add it to our repository (using the touch command):
1 2 3 4 | te:testProject te$ touch testFileB.txt te:testProject te$ ls testFileA.txt testFileB.txt te:testProject te$ |
Then we edit our testFileA.txt (i.e. add a new line of text).
Now – if we want to add and commit the changes to the repository we will do the same steps as before using the git add and git commit -m “message” commands:
1 2 3 4 5 | te:testProject te$ git add testFileA.txt testFileB.txt te:testProject te$ git commit -m "added a new feature" [testBranch 7cdf780] added a new feature 2 files changed, 2 insertions(+), 1 deletion(-) create mode 100644 testFileB.txt |
We have committed the changes to our testBranch , not to the master branch.
We can view what is in our master branch at any time by switching back to it using the git checkout master command:
1 2 | te:testProject te$ git checkout master Switched to branch 'master' |
If you look in your repository – you should see that we have now gone back to the former state!
Lets go back to the testBranch – this time we do not need the argument “-b” as the branch already exists (we do not need to create anew):
1 2 | te:testProject te$ git checkout testBranch Switched to branch 'testBranch' |
Ok – lets say we are happy with our changes and we want those changes to be reflected in our master branch. We need to perform a merge operation to do this. For more in depth info on merge, please follow this link.
The command for merge is written as git merge < branchname > . You also need to be sure that you are CURRENTLY on the branch that you want to merge into. We can verify that we are on the master branch (the branch that we want to merge INTO) by using the git status command:
1 2 3 | te:testProject te$ git status On branch testBranch nothing to commit, working directory clean |
We are not! – SO we perform the git checkout master command:
1 2 | te:testProject te$ git checkout master Switched to branch 'master' |
Then we do our git merge testBranch -m
1 2 3 4 5 6 7 | te:testProject te$ git merge testBranch -m "our first merge" Updating df7af48..7cdf780 Fast-forward testFileA.txt | 3 ++- testFileB.txt | 0 2 files changed, 2 insertions(+), 1 deletion(-) create mode 100644 testFileB.txt |
using the git status command – we verify we are still on our master branch:::
1 2 3 | te:testProject te$ git status On branch master nothing to commit, working directory clean |
And now if you open your repository – you should see that the files from the other branch on now in your current snapshot. Note: the merge operation is quite advanced – and there may be cases where git decides that it will not perform the merge operation due to file conflicts (i.e. 2 files have been changed in a way that they cannot be merged automatically). In this case, git will attempt to indicate to you where the files are conflicting and you will need to manually resolve the conflicts. We will not go into the strategies in this workshop but please read the documentation here – as it is very clear.
Step 7: Create a new repository on GitHub
If you only want to keep track of your code locally, you don’t need to use GitHub. But if you want to work with a team, you can use GitHub to collaboratively modify the project’s code. Also, even if you are working on your own it is a good idea to use GitHub as a backup in case something should happen to your machine. Finally, having a repository on GitHub makes it easily accessible anywhere – even when you don’t have your machine on hand.
- To create a new repo on GitHub, log in and go to the GitHub home page. You should see a green ‘+ New repository’ button on the right side of the page.
- After clicking the button, GitHub will ask you to name your repository and provide a brief description.
- Fill in the info and then click on the green button labelled ‘Create repository’ to create the repository.
- GitHub will now ask if you want to create a new repository from scratch or if you want to add a repository you have created locally. In this case, since we’ve already created a new repository locally, we want to push that onto GitHub so follow the ‘….or push an existing repository from the command line’ section:
- So copy the lines from github into your terminal – make sure that you are within the repository:
1
2
3
4
5
6
7
8
9
10
11
12
te:testProject te$ git remote add origin https://github.com/intrvalia/testWorkshopRepo.git
te:testProject te$ git push -u origin master
Username for 'https://github.com': intrvalia
Password for 'https://intrvalia@github.com':
Counting objects: 9, done.
Delta compression using up to 4 threads.
Compressing objects: 100% (4/4), done.
Writing objects: 100% (9/9), 713 bytes | 0 bytes/s, done.
Total 9 (delta 0), reused 0 (delta 0)
To https://github.com/intrvalia/testWorkshopRepo.git
 * [new branch]      master -> master
Branch master set up to track remote branch master from origin.
What have we done?
Well the first command specifies that we want to add a remote connection between our LOCAL repository and the one on github. We do this by using the git remote add origin <url >. Note “origin” is the default namespace.
We then need to run the command that will upload the current state of the repository to the repository on github by using the git push -u origin < branchname > command. If successful github will ask you to verify your identity (put in your github username and password) and then it will start uploading … once done it will give you a message indicating that the remote connection now contains an “upstream” branch also called “master”.
If you now go back to the github webpage and click on repository name heading – you will see a listing of the files available now in the REMOTE repository. (They are currently an exact mirror of your local repository).
If you now run the command git branch -a :
1 2 3 4 | testProject te$ git branch -a * master testBranch remotes/origin/master |
We now get a listing of all the branches associated with the repository – remote AND local.
Also, if you run the command git remote -v :
1 2 3 | te:testProject te$ git remote -v origin https://github.com/intrvalia/testWorkshopRepo.git (fetch) origin https://github.com/intrvalia/testWorkshopRepo.git (push) |
You will see the remote urls associated with this repository. You can have more than one remote connection – but we will only worry about one ….
Note:
- git fetch: is for downloading the contents on the remote repository to your local version (does not alter your working local version)
- git push: is for uploading the changes from your local repository to the remote.
Step 8: Push a branch to GitHub
We have only pushed our master branch – NOT our testBranch – well we need not in this case because remember we merged our changes from the testBranch to the master. Lets create a new LOCAL branch … by using the git checkout -b < branchname > – make sure you are currently on the master branch when doing this (use git status to verify ..)
1 2 3 4 5 6 | te:testProject te$ git status On branch master Your branch is up-to-date with 'origin/master'. nothing to commit, working directory clean te:testProject te$ git checkout -b "test2Branch" Switched to a new branch 'test2Branch' |
Now make some changes to your files and then run the add and commit commands:
1 2 3 4 5 | te:testProject te$ git add . te:testProject te$ git commit -m "made some super important changes" [test2Branch d219341] made some super important changes 3 files changed, 4 insertions(+), 1 deletion(-) create mode 100644 testCFile.text |
Now we’ll push the commit in your branch to your GitHub repository. This allows other people to see the changes you’ve made. If they’re approved by the repository’s owner, the changes can then be merged into the master branch.
To push changes onto a new branch on GitHub, you’ll want to run git push origin < yourbranchname > . GitHub will automatically create the branch for you on the remote repository:
1 2 3 4 5 6 7 8 9 10 | te:testProject te$ git push origin test2Branch Username for 'https://github.com': intrvalia Password for 'https://intrvalia@github.com': Counting objects: 5, done. Delta compression using up to 4 threads. Compressing objects: 100% (3/3), done. Writing objects: 100% (5/5), 416 bytes | 0 bytes/s, done. Total 5 (delta 0), reused 0 (delta 0) To https://github.com/intrvalia/testWorkshopRepo.git * [new branch] test2Branch -> test2Branch |
Again – if you go to the github webpage for your repository and click on the branch button – you should now see an entry for your new remote branch – click on it and you should see the files within THAT branch …
Also – you can run the git branch -a command to verify we have a SECOND remote branch:
1 2 3 4 5 6 | te:testProject te$ git branch -a master * test2Branch testBranch remotes/origin/master remotes/origin/test2Branch |
Step 9: Deleting a branch
At this point we have 2 remote branches:
- remotes/origin/master
- remotes/origin/test2Branch
And 3 local branches:
- master
- test2Branch
- testBranch
Lets delete the FIRST local branch we made since we have ALREADY merged that one with the master. Use the git delete -D < branchname > command:
1 2 | te:testProject te$ git branch -D testBranch Deleted branch testBranch (was 7cdf780). |
Then run git branch -a to verify that the LOCAL branch is gone.
1 2 3 4 5 | te:testProject te$ git branch -a master * test2Branch remotes/origin/master remotes/origin/test2Branch |
Step 10: Cloning a repository
The last topic that we will go over in this intro workshop is cloning a repository. This topic is especially necessary when you are collaborating with others on the same project. However, in this context (to keep things simple) we will consider the scenario where you have the repository online (on github) and you would like to download, make changes and re- upload on a machine OTHER than the one that currently holds the local repository.
In order for this to work – we first need to delete the local repo from our machine (pretend we are on a different machine:) SO : just remove (move to Trash) the repository.
- Now go back to the github page online, and make sure you are looking at the webpage for the repository you just uploaded moments ago.
- Now access the green button labelled “clone or download”. If you click on the triangle you will see a little tab with a url on it. This is the unique url for where your repository currently resides. The idea is that we can take this url and use it to access the repository and effectively download it anywhere.
- Please DO not select the download option. This will just download a zip archive of the project but will not be a properly linked repository.
- You COULD select the open in desktop option. This option will download the repo and link it into the GitHub Desktop client. The git operation used to download is called cloning . I would prefer if we do not use this option as too many steps are done at once – and you may not always be using GitHub Desktop. We will therefore do it the manual way.
- Please select the use HTTPS option.
Do not worry for now about ssh. This is just the protocol we are using to download / upload files and at this point the choice of protocol makes no difference.
So – copy the url: should be something like: https://github.com/intrvalia/testWorkshopRepo.git. - Now go back to the Terminal Application – make sure you are within the project directory and type: git clone <url>
1 2 3 4 5 6 7 8 | te:webProjects te$ git clone https://github.com/intrvalia/testWorkshopRepo.git Cloning into 'testWorkshopRepo'... remote: Counting objects: 23, done. remote: Compressing objects: 100% (10/10), done. remote: Total 23 (delta 6), reused 23 (delta 6), pack-reused 0 Unpacking objects: 100% (23/23), done. Checking connectivity... done. te:webProjects te$ |
Now – if you look in your projects directory you will see that you have successfully downloaded the working git repository and are now able to use it as a normal working repo.
Lets ensure that we have downloaded all the working branches: in your Terminal, use the change directory command to switch to repo directory. Then use the git branch -a command. Your output should be similar to this:
1 2 3 4 5 6 | te:testWorkshopRepo te$ git branch -a * master remotes/origin/HEAD -> origin/master remotes/origin/master remotes/origin/test2Branch te:testWorkshopRepo te$ |
This indicates that we are currently on the master branch, and we have 2 remote branches. If we want to access the second branch we just use the usual git checkout <branchname> command:
1 2 3 4 5 6 7 8 9 10 | te:testWorkshopRepo te$ git checkout test2Branch Branch test2Branch set up to track remote branch test2Branch from origin. Switched to a new branch 'test2Branch' te:testWorkshopRepo te$ git branch -a master * test2Branch remotes/origin/HEAD -> origin/master remotes/origin/master remotes/origin/test2Branch te:testWorkshopRepo te$ |
So we checked out the other branch – as well as you can see from the Terminal output, when we run the git branch -a command – we also have a new local branch… This allows us to now make changes to the test2Branch locally as before (add/commit), and only when we decide to – will we push the modified branch to the server.
So – thats it for the first tutorial. I specifically chose not to confuse you by introducing a git client. Why? Because behind every git client is git – and all the operations we have gone through: clone,push,add,commit — are the operations that the git client performs for you. I encourage you to find a client, that makes your life easier – in the next session I will introduce the github desktop client – however for debugging – the terminal is the best tool.